

Jupiter
On This Page
HP
Phases
Rewards
Mesos
Drops
 Chaos Pitched Accessory Box(x1)
 Grindstone of Life(x1)
 Jupiteroid(x1)
 Life Ring Box(x1)
Video Guides
Related Links
Battle Overview
Jupiter (유피테르, Yupiterŭ) is the leader of the Ancient Gods and the endgame boss of Geardrak, the level 295 area from the third and final patch of the MapleStory CROWN update. Entry requires character level 295 and completion of the "[Geardrak] Epilogue" quest. Normal and Hard both require at least 810 Authentic Force (SAC/AUT) to deal full damage. Every Jupiter attack deals a percentage of your max HP and ignores avoidability and damage reduction, so all of it must be dodged manually. Throughout this guide, two damage figures written as "40% / 50%" mean Normal / Hard.
- Level: 295
- Defense (PDR): 380%
- Required Authentic Force: 810
- Jupiter resists the Slow debuff, Critical Bind, and Shadow Rain.
Phases
The fight is one continuous encounter with no discrete numbered phases; instead it gains new patterns and a background change at set HP thresholds. The health bar is drawn as three lines, each about one third.
| Phase | Remaining HP |
|---|---|
| Phase 1 | 100% - 80% |
| Phase 2 | 79.9% - 50% |
| Phase 3 | 49.9% - 0% |
When Phase 2 and Phase 3 begin, an effect plays and cracks appear in the map background.
Rupture Value (Death Count)
Rupture Value is each player's personal death counter, starting at 0. Reaching 1000 forcibly ejects that player from the fight. Dying (HP reaching 0) raises Rupture by 150 while separated and by 200 while combined, and many patterns raise or lower it as well.
Entry
The fight begins on a shared entrance map, "Cycle of Order and Chaos." A boundary runs down the center: which boss you face depends on which side you stand on. The left side puts you against the separated Jupiter, the right side against the separated Alchemic Matter (연성체). Each map holds up to 2 players.
Summary of the whole fight: while separated, or combined into Jupiter of Balance, focus on keeping the gauge balanced; while combined into any non-Balance form, just focus on not getting hit.
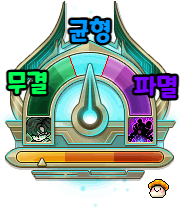
The core system is the Magic Sync Gauge, which runs 0-1000 and starts at 500 (neutral). It is shared by the whole party. Getting hit on the Jupiter map moves it left (decrease); getting hit on the Alchemic Matter map moves it right (increase). The gauge is divided into named bands, and the band you are in at merge time decides which combined form appears:
| Magic Sync Gauge | 0-200 | 201-300 | 301-399 | 400-600 | 601-700 | 701-800 | 801-1000 |
|---|---|---|---|---|---|---|---|
| Band | Runaway | Excessive | Slight | Neutral | Slight | Excessive | Runaway |
| Combine into | Perfection | Perfection | Perfection | Balance | Destruction | Destruction | Destruction |
Jupiter's Command
Jupiter issues a Command every 50 seconds in Phase 1, every 40 seconds in Phase 2, and every 30 seconds in Phase 3. When the Command fires, your Rupture Value changes based on whether the gauge is in the Neutral band.
If the gauge is not neutral when the Command fires, battlefield imbalance is detected and Rupture rises by 60 / 80 / 100 for the Slight / Excessive / Runaway bands. In Phase 3 the Command additionally forces the gauge outward: a gauge in 0-399 is pushed by -150, and a gauge in 601-1000 is pushed by +150.
If the gauge is neutral when the Command fires, balance is maintained and Rupture falls by 10. In Phase 3 the Command still forces the gauge even on a success: 400-499 is set to 350, 500 is set anywhere from 350-650, and 501-600 is set to 650 - so keeping Balance every cycle is no longer guaranteed in Phase 3.
Combination Initiative Gauge
A separate Combination Initiative Gauge runs across stages 0-2 (shared, starting at 0). When a combined form splits back apart, splitting from Jupiter of Balance drops the gauge one stage; splitting from any other form raises it one stage. While the gauge is above 0, taking a hit (separated or combined) raises Rupture: +5 at stage 1, +10 at stage 2.
| Current Initiative Gauge | Stage 0 | Stage 1 | Stage 2 |
|---|---|---|---|
| Rupture per hit | none | +5 | +10 |
Rupture gained this way can be recovered on the next combined-to-separated transition if the next Initiative Gauge is at stage 0; if it is at stage 2 instead, nothing is recovered and Rupture rises by 100. The recovery ratio shrinks each time the gauge sits above 0: roughly 40% the first couple of times, ~25% the third, ~10% the fourth, and 0% from the fifth onward - so the gauge and its Rupture cost creep upward over the fight.
Moving Between Maps (Ether Warp)
Using the NPC / gather key casts Ether Warp, moving you between the separated Jupiter and Alchemic Matter maps. You cannot cross if the target map already holds 2 players. The cooldown is 15 / 20 / 30 seconds for a party of 1 / 2 / 3.
Separated to Combined
In the separated state the bosses merge on a timer: every 2:30 in Phase 1, every 2:00 in Phase 2, and every 1:30 in Phase 3. A warning appears 7.5 seconds before the merge, and the remaining time is shown under the death counter at the top of the map. The combined boss is fought by the whole party together.
Which form appears is set by the Magic Sync Gauge band at merge time (see the table above). In Hard mode, every third combination forces a non-Balance form even if the gauge was kept neutral - odd-numbered forced merges become Jupiter of Perfection, otherwise Jupiter of Destruction. If the gauge is off-neutral it combines normally into Perfection or Destruction.
Combined State
Only Jupiter of Balance shows a combined-state gauge: a personal Magic Bias Gauge running -7 to +7 (starting at 0, tracked per player, not shared). Your bias at separation raises or lowers your Rupture Value.
| Magic Bias Gauge | -7 to -4 | -3 to -2 | -1 to +1 | +2 to +3 | +4 to +7 |
|---|---|---|---|---|---|
| State | Severe bias (3) | Slight bias (2) | Balanced (1) | Slight bias (2) | Severe bias (3) |
Combined to Separated
A warning appears 7.5 seconds before splitting, and the combined state lasts about 1:40 regardless of phase. Players are returned to their original maps. Splitting from Jupiter of Balance drops the Combination Initiative Gauge one stage; splitting from any other form raises it one stage.
Separated - Jupiter
- Pattern 1 - Long Slash: a wide forward swing that knocks back. 40% / 50% HP, gauge -60, cooldown 5s.
- Pattern 2 - Short Slash: a shorter forward swing. 35% / 45% HP, gauge -50, cooldown 18s.
Patterns 3 and 4 share a detection check: if the target is outside Jupiter's detection range he uses the teleport attack (Pattern 3); if inside, he uses a telegraphed ground explosion (Pattern 4).
- Pattern 3 - Teleport Beam: teleports to a distant player and strikes. 65% / 70% HP, gauge -100, cooldown 20s (shared with Pattern 4).
- Pattern 4 - Green Zone Explosion (Phase 2+): drops a zone at your position, then detonates it. First hit 60% HP (gauge -80), second hit 80% HP (gauge -110), cooldown 25s (shared with Pattern 3).
- Pattern 5 - Minion Summon (Phase 3): when 1 or 2 players are on the Jupiter map, summons 3 or 5 minions respectively, cooldown 30s. Minions strike nearby players for 25% HP (gauge -30, cooldown 2s). If they are not killed within about 7 seconds the survivors vanish and leave floor zones: 1 left creates 2 zones (15% HP, gauge -30); 2 left create 3 zones (20% HP every 0.5s for 2s, gauge -35).
- Pattern 6 - Airborne Attack: hits nearby players and launches them into the air. 70% HP, gauge -90, cooldown 15s.
- Pattern 7 - Rear Attack: strikes behind Jupiter (the gauntlet side). 30% / 40% HP, gauge -45, cooldown 18s.
- Pattern 8 - Overhead Slam: hits nearby players; crouch / lie down to avoid. 40% / 50% HP, gauge -55, cooldown 18s.
- Map Pattern 1 - Pillar Field: five pillar zones appear at 0.75s intervals and explode about 1.5s after appearing (60% chance one at a time x5; 40% chance two at once then one x3). Standing in the gap between pillars is safe. 30% HP, gauge -35, cooldown 13s.
- Map Pattern 2 - Lance Protocol: a player-tracking laser fires in 4 sets at 1.11s intervals; each set fires 1-3 lasers (more lasers in later phases). 40% / 45% HP, gauge -70, cooldown 17s. Because it tracks a specific player and moves the gauge hard, it is the fastest way to intentionally push the gauge back toward Jupiter's side.
Separated - Alchemic Matter
Alchemic Matter (연성체) uses the Execution Stigma mechanic from Phase 3: its combo hits (Patterns 3-6) each apply 1 stack, up to 2, and the stacks change how much damage its finishers (Patterns 7, 8) deal. Stacks clear when the combo ends. Its combos target one random player as aggro - identifying who is targeted lets the rest of the party ignore the pattern.
- Pattern 1 - Slash then Beam: a frontal hit, then a wide laser. Crouch the first hit; the two hits can face different directions. Cooldown 7s. Each hit 40% / 50% HP, gauge +50 (first hit also knocks back).
-
Pattern 2 - Combo: a linked sequence. It opens with Pattern 3 (teleport), then plays three of Patterns 4/5/6 at random, and from Phase 3 finishes with Pattern 7 or 8.
-
Pattern 3 - Combo Starter: teleports to a player and leaps from a telegraphed zone. 25% HP, gauge +25; from Phase 3 also +1 Stigma.
- Pattern 4 - Dash: charges forward; crouch to avoid. 40% / 45% HP, gauge +45; from Phase 3 +1 Stigma.
- Pattern 5 - Teleport Slam: teleports near a player and slams down. 40% / 45% HP, gauge +45; from Phase 3 +1 Stigma.
- Pattern 6 - Rings: spawns 5-9 rings around the boss (four possible layouts); only the ring edges have a hitbox. 40% / 45% HP, gauge +45; from Phase 3 +1 Stigma.
- Pattern 7 - Wide Frontal Finisher (Phase 3): a wide forward attack; crouch to avoid. On hit: 1s stun and gauge +60; then 0.48s later the damage scales with Stigma - 0 stacks 40% / 60% HP (gauge +90), 1 stack 50% / 90% HP (gauge +100), 2 stacks 200% HP.
- Pattern 8 - Orb Explosion Finisher (Phase 3): spawns an orb at your position and detonates it. Same stun and Stigma-scaled damage as Pattern 7.
- Pattern 9 - Tracking Pillars: eight pillars chase the target (timed 1-1-1-2-3), then a finishing hit around the boss. Pillars 20% / 25% HP (gauge +30); finisher 60% HP (gauge +60), cooldown 30s.
- Pattern 10 - Full-Map Laser: 16 lasers appear across the whole map and detonate together. 200% HP, gauge +100, cooldown 90s.
- Pattern 11 - Bouncing Projectiles (Phase 2+): eight projectiles travel telegraphed paths and ricochet off walls. 30% / 40% HP, gauge +30, cooldown 30s.
- Pattern 12 - Fan Attack (Phase 3): teleports to a player, then sweeps fan-shaped zones several times (four layouts). Getting hit or leaving the circular arena deals 30% / 40% HP, gauge +25, cooldown 45s.
- Map Pattern 1 - Pillar Field: 8-9 pillar zones appear at 0.45s intervals and explode about 1.8s later. 25% HP, gauge +15, cooldown 8s.
- Map Pattern 2 - Cracks (Phase 2+): 4-5 long cracks form at various angles. 30% HP, gauge +20, cooldown 8s.
Combined - Jupiter of Perfection
The form when the gauge was pushed toward Jupiter's side at merge time.
- Pattern 1 - Front Attack: a forward strike with knockback. 50% HP, cooldown 15s.
-
Pattern 2 - Side Attack: hits left and right with knockback. 45% HP, cooldown 6s.
-
Pattern 3 - Minion Summon: summons 3 / 5 / 7 minions for a party of 1 / 2 / 3, cooldown 30s. Each minion aims a player and fires two projectiles 0.4s apart (30% HP, cooldown 5s). If not killed within about 7s the survivors leave scaling floor zones.
- Pattern 4 - Restricted Zone (Phase 2+): places a zone at a player that lasts about 4s. Inside it you take 25% HP every 0.5s and your final damage is reduced by 80%. Cooldown 18s.
- Pattern 5 - Lock-On Bombardment (Phase 3): ~1.4s after cast an effect marks one player, tracks for ~1.3s, then erupts in a very large explosion 1.2s later. Once marked it cannot be avoided: 200% HP and a 2s stun, cooldown 25s.
-
Pattern 6 - Overhead: hits nearby players; crouch to avoid. 65% HP, cooldown 15s.
-
Pattern 7 - Wide Ring: hits a wide area except the center. 80% / 90% HP and a 2s Weakness debuff, cooldown 15s.
- Map Pattern 1 - Drones: drones track a player for ~1s then attack that spot for ~2s, dealing 25% HP every 0.5s inside, cooldown 13s.
- Map Pattern 2 - Aimed Laser: a Lance-Protocol-style tracking laser, 4 sets at 1.11s intervals, 1-3 lasers each. 40% / 50% HP, cooldown 17s.
- Map Pattern 3 - Color-Matching Command: a symbol appears over each player's head, and the party must move to the map zone whose symbol matches. The check repeats twice and its Rupture change applies each time.
If every player reaches the correct zone the check passes and Rupture falls by 10; failing to reach it within about 5 seconds raises Rupture by 50.
Combined - Jupiter of Balance
The default form when the gauge was neutral at merge time. This form uses the personal Magic Bias Gauge (see Combined State above); several patterns push it green (-1) or purple (+1).
- Pattern 1 - Front Attack: a forward swing with knockback that hits even if you crouch. 50% HP, Bias +1, cooldown 15s.
- Pattern 2 - Nearby Attack: hits around the boss with knockback. 50% / 60% HP, Bias -1, cooldown 10s.
- Pattern 3 - Paired Explosions: six telegraphed explosions. Through Phase 2 they are 3 green and 3 purple; in Phase 3 up to 4 of one color can appear. 40% / 45% HP; green shifts Bias -1, purple shifts Bias +1, cooldown 14s.
- Pattern 4 - Chains (Phase 3): three chains land every 1.2s at various angles (one of five set layouts); each flashes (first hit 10% HP, Bias -1) then explodes (second hit 55% HP, 1s stun), cooldown 30s.
- Pattern 5 - Triple Front: three forward hits (crouch the first two; directions can differ). Hits 1-2 are 20% HP (Bias +1), hit 3 is 40% HP (Bias +1). Between hits there is a 70% chance the pattern cancels into Pattern 7.
- Pattern 7 - Wide Front: fires when Pattern 5 cancels. A wide forward attack, 40% HP, Bias -1.
- Pattern 6 - Aimed Projectiles (Phase 2+): 15 projectiles appear at the top of the map; each locks a player after 0.9-2.4s and fires 0.9s later. 30% / 35% HP, Bias +1 (once).
- Pattern 8 - Overhead: hits nearby players; crouch to avoid. 65% HP, Bias -1, cooldown 15s.
- Pattern 9 - Wide Ring: hits a wide area except the center. 80% / 90% HP, 2s Weakness, Bias +1, cooldown 15s.
- Map Pattern 1 - Oval Objects (Phase 2+): two oval objects spawn 1400px apart; each object's hit range expands three times at 0.5s intervals. 30% / 40% HP, no Bias change, cooldown 30s.
- Map Pattern 2 - Drones: drones track ~1s then attack ~2s, 15% HP every 0.5s inside, Bias -1 (first hit only), cooldown 13s.
- Map Pattern 3 - Floor Zones: four floor zones stay for 5s; touching one before it vanishes triggers a hit about 1.5s later for 35% HP, Bias +1, and a random teleport, cooldown 20s.
Combined - Jupiter of Destruction
The form when the gauge was pushed toward Alchemic Matter at merge time. It has no gimmick of its own; its patterns largely mirror the separated forms but hit harder and are harder to read, so HP management matters more than memorization. It also carries the Execution Stigma mechanic on its combo (Patterns 5-8 stack it, up to 2, scaling the finishers 9 and 10).
- Pattern 1/2 - Ground Zones: 70% of the time it targets your position (Pattern 1), 30% your left and right (Pattern 2). 60% HP, cooldown 7s.
- Pattern 4 - Combo: opens with Pattern 5 (teleport), plays three of Patterns 6/7/8 at random, and finishes with Pattern 9 or 10.
- Pattern 5 - Combo Starter: teleports and leaps from a telegraphed zone. 45% HP, +1 Stigma.
- Pattern 6 - Dash: charges forward; crouch to avoid. 50% / 60% HP, +1 Stigma.
- Pattern 7 - Teleport Slam: teleports near a player and slams. 50% / 60% HP, +1 Stigma.
- Pattern 8 - Rings: 5-9 rings with edge-only hitboxes, same as Alchemic Matter. 50% / 60% HP, +1 Stigma.
- Pattern 9 - Wide Frontal Finisher: a wide forward attack; crouch to avoid. 1s stun, then 0.48s later damage scales with Stigma - 0 stacks 40% / 60% HP, 1 stack 50% / 90% HP, 2 stacks 200% HP.
- Pattern 10 - Orb Explosion Finisher: spawns an orb at your position and detonates it, with the same Stigma scaling as Pattern 9.
- Pattern 11 - Front Attack: a forward strike with knockback. 50% HP, cooldown 20s.
- Pattern 12 - Tracking Crack (Phase 3): a telegraph chases you, then a large crack forms and erupts 2.1s later. 200% HP, cooldown 20s.
- Pattern 13 - Projectiles (Phase 2+): five projectiles launch at players. 50% HP, cooldown 20s.
- Pattern 14 - Overhead: hits nearby players; crouch to avoid. 65% HP, cooldown 20s.
- Pattern 15 - Wide Ring: hits a wide area except the center. 80% / 90% HP, 2s Weakness, cooldown 20s.
- Map Pattern 1 - Pillar Field: 7-8 pillar zones at 0.45s intervals, explode ~1.8s later. 35% HP, cooldown 8s.
- Map Pattern 2 - Cracks: 4-5 long cracks at various angles. 40% HP, cooldown 8s.
Pattern clips sourced from the Naver blog seotbeo.